


How to Order
These are step by step instruction for ordering Brochures or Flyers
This will open in a new tab/window. You can close after
viewing and continue with your order
How To Order Direct Mail Postcards – Video
This will open in a new tab/window. You can close after
viewing and continue with your order.

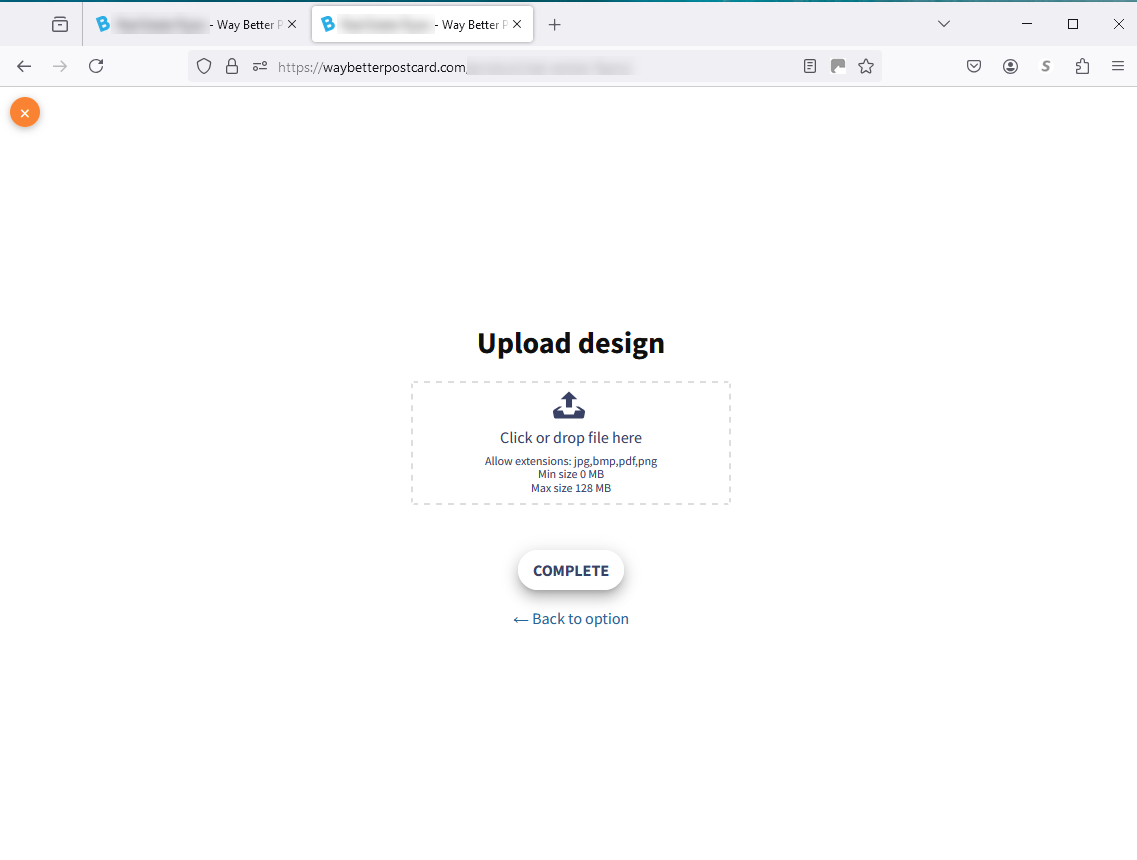
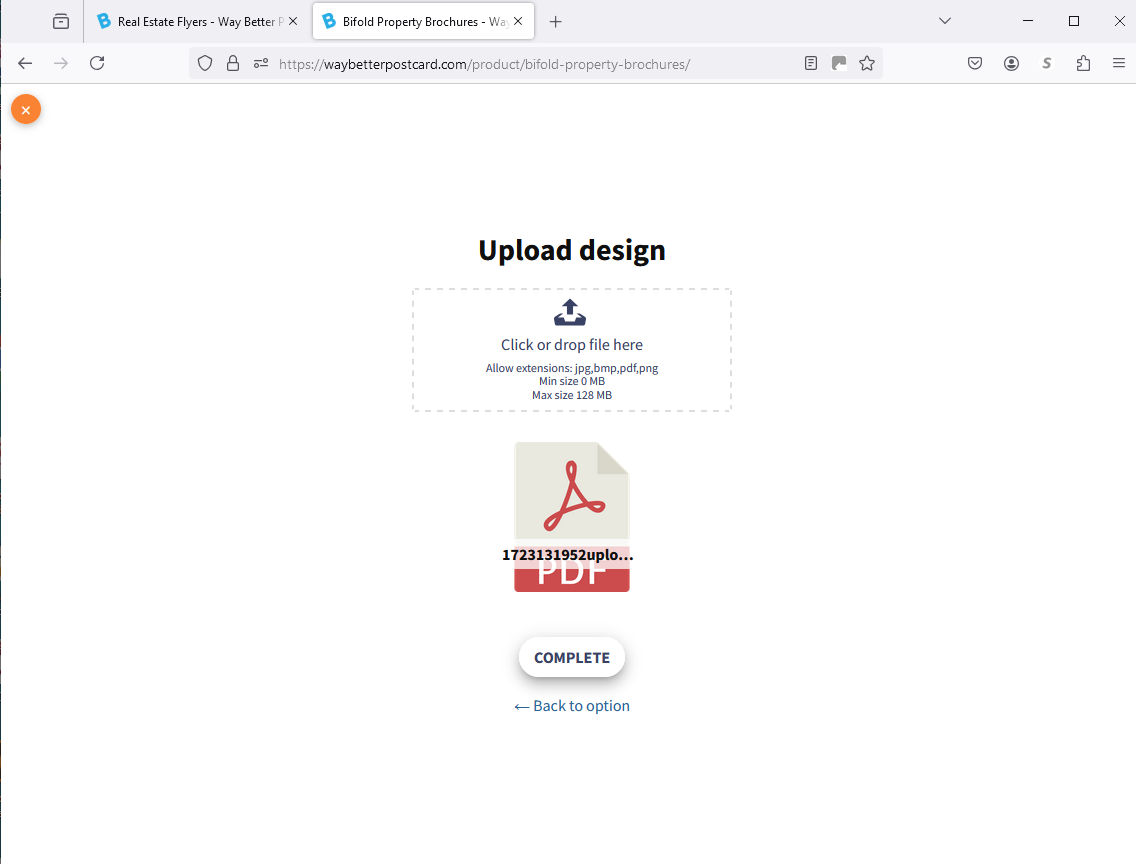
The Upload Page will open
- Drag or browse your file into the Upload Box area. (below left image)
- Once your file is uploaded, it will display “COMPLETE” (below right image)
- Your art and file are now in your Cart and ready to advance to Checkout
We offer one of the easiest online design platforms available. Although it is our own platform we have modeled similar to what you’ll find used on the web for other web to print applications, thus familiarity should be easy for all!
However if you would rather have us create a custom postcard for a direct mail campaign and you have ordered from us before, or you have requested this product be installed for you, then our Custom Postcards might be the best fit.
Keep in mind this is an “end to end session” so once you start you have to complete and submit. No information, text or selections are saved here . For these features simply use our online templates or start form scratch templates as mentioned above
Complete and Submit this Design Order Form – to place an order for custom designed postcards to be printed and mailed via the USPS to a targeted area. This is an end to end session so once you start you have to complete and submit no information, text or selections are saved. For these features simply use our inline templates or start form scratch templates.
For more info on this product and how to complete and submit this form watch Order Custom Direct Mail Postcards
Designing your artwork or layout in your brokerage online platform? GREAT!

Many brokerages today have advance and often easy to use Online Designers, similar to what we use, And just as us they offer their agents templates. This is perfect and often keeps you in their guidelines for use, compliance and identity.
Make all your photo selections, changes and edits – usually when you have completed the project there will be an option to either:
- Save
- Save As
- Download
- Print Ready PDF
- Export
In addition you might find associated with those, info similar to for
- Print Ready PDF
- Commercial Printer
- Printer of your choice
- Outside Print Shop
- Local Printer
Any of these will work, the goal being to save the layout you just completed to a hi res PDF file on your own laptop, PC or device.
The type of PDF or quality/resolution of the PDF you are going to save is important, however if the selection you made was associated with any of those types of printers above, rest assured that the file is ok
If you don’t see any size or quality/resolution options most likely it will be a hi resolution/print ready file and you are fine. If by change you see low resolution or an option for emailing these might not be the best, but if they are your only options then select them.
Here are the common steps to Design Save and Upload on our site from any other design platform or Canva etc.
Design/Layout/Artwork
Compass Agents can use the Compass Marketing Center to compose – design their brochures, postcards, books, booklets and even more print marketing collateral. It is a great resource and you can easily export your file and then upload and order from our dedicated Compass Enterprise site.
After you have designed your brochure or postcard or other item, you have the choice to send it to can send it to their larger printer Xpress Docs or you can save it as a PDF and place your order with us
- No min quantity
- Same Day Print and Ship on time sensitive many items
- 3pm EST Cutoff time for Next Day Arrival
- Discounted Next day Shipping
Below is a screen shot of where – that is when you are finishing up in the Marketing Center and ready to order.

Easy Steps
- Select Print Ready PDF- High quality print optimized and then include add bleed and crop marks.
- This will then download and ask where you want to save to – like your desktop for quick reference.
- Then from our site, place your order and upload your Marketing Center Design file right in the product you are ordering.
This link below should give you a pretty good step by step of how to order brochures and booklets with us after you have downloaded a Print Ready PDF
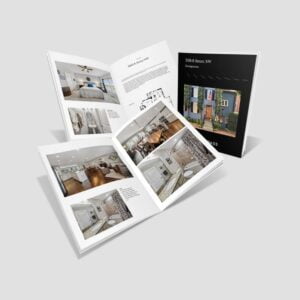
Brochures and Booklets
Quick Video
Easy Step by Steps
Postcards & Other Direct Mail Products
This link below should give you a pretty good step by step of how to order postcards with us after you have downloaded a Print Ready PDF
Mailing Lists
My Mailing List is our list manager platform built to help you maintain your mailing list. It is Simple and Straight Forward. We do all the work! Before each mailing and/or every 60 days, these lists are processed for accuracy, duplicate addresses removed, vacant homes, known deceased, both NCOA (USPS Change of Address system) as well as PCOA (a private change of address registry we subscribe to via the 3 largest credit bureaus). We can also suppress any names you might have on your Do Not Mail list (if you use). You can easily remove contacts by contacting us through your account “My Account & My Mailing List”. Create a new mailing list using our List Builder Platforms or Have Us Build a Custom List or Append records to you list- How long have they lived there, what is the LTV, Ages, etc…
- Upload your SOI mailing lists have it cleaned, updated – Did someone move or pass away?
- Add/Remove individual addresses to your SOI or Do Not Mail List
- Choose multiple mailing lists for one mailer
- Order List Insight – As your list is cleaned and processed for mailing, we generate possible leads – Vacant Homes, Deceased individuals and/or addresses in probate.
- Have us append additional data or emails
1. Select Closest Relevant Homes- Option 1 (most popular)

2. Using the featured address of your card (or typed- in the “Configure” section) we will compile a list of real property (SFH or Multi-Dwelling depending the featured address).
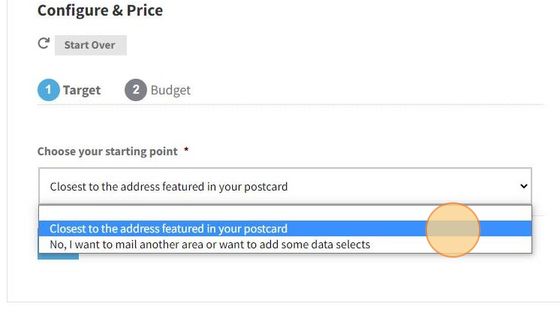
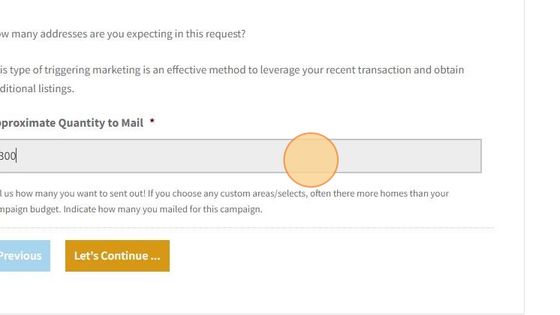
3. Enter the QUANITY you want to mail for this campaign here, and continue.
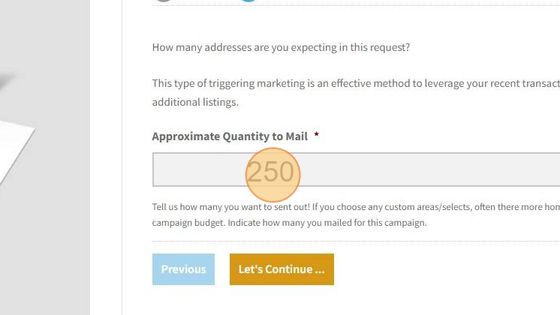
4. You’ll return to “Configure & Price” to complete your other selections Order Quantity has been updated, however you can still change the total if you would like
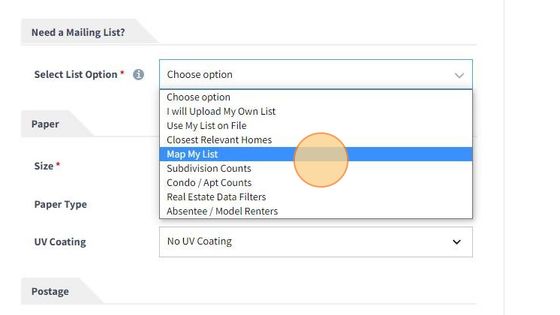
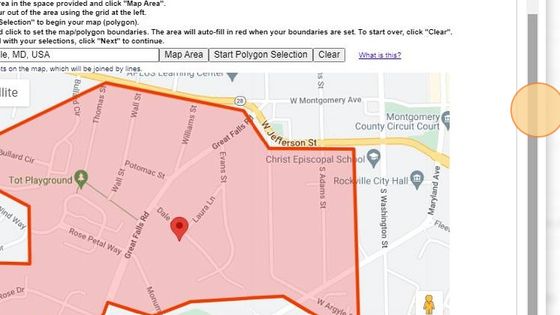
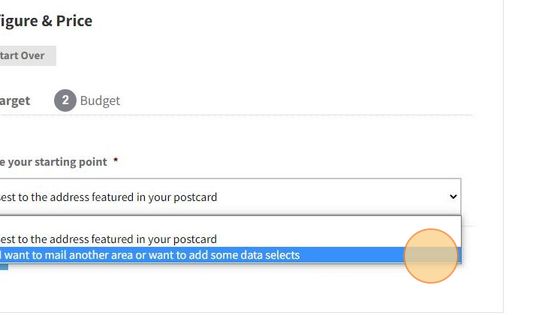
1. Go To: Map My List
2. A new pop up window will open. This is where you can choose what method to define the Geo Area you want for your list. It defaults to Polygon
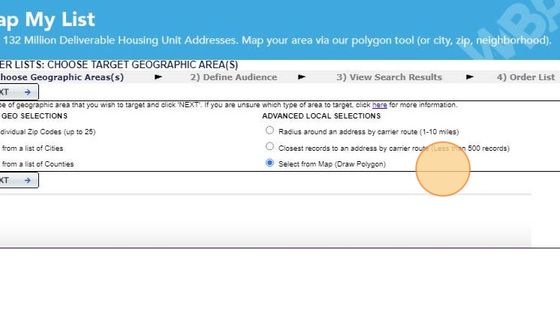
3. Now enter your starting point, Ether and address or Zip Code or neighbor and state or zip.
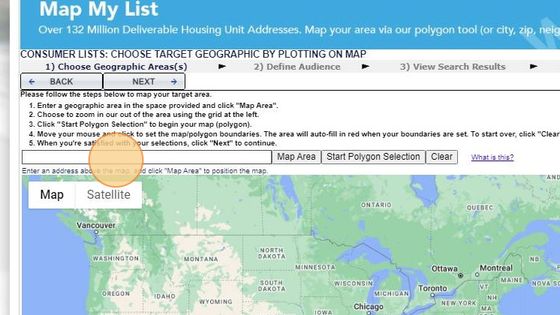
4. Then you want to Click “Map Area” and the platform will go that designated starting point.

5. When you are ready to start your Polygon and define your area for your list, Click > Start Polygon Selection from Gray Tool Bar.

6. With your mouse hover over where you want to start and to star left click.
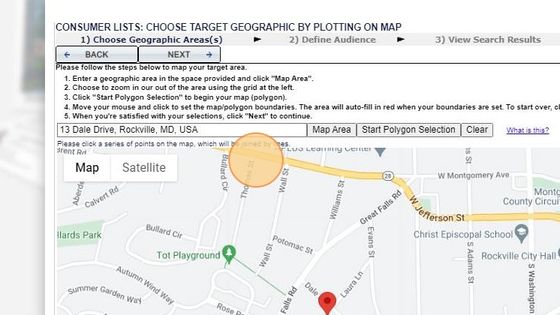
7. Continue defining/selecting your boundaries.
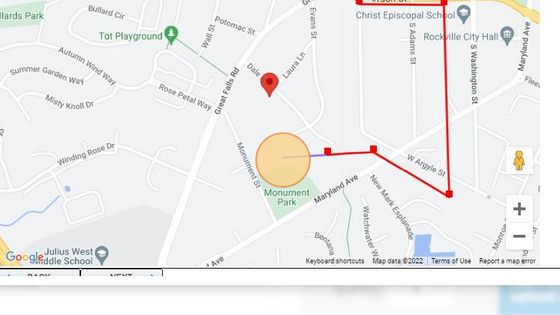
8. Once you end points are connected you will see your area highlighted in the red. You can always you your scroll bar and zoom tools.
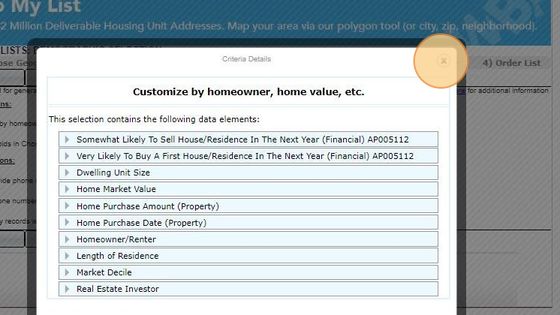
9. We offer various types of real estate centric data filters.
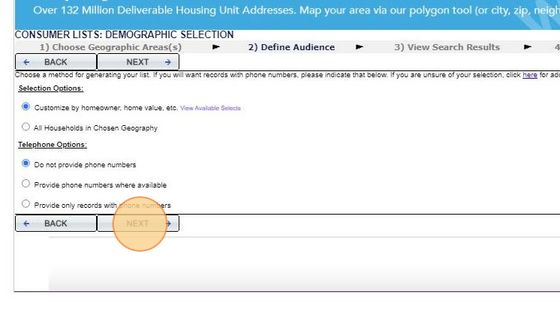
10. Review your choices here but have preset default with our recommendations. If you want telephone number on average 60% of those you selected will be available and there might be an additional charge of $0.05-0.08 each. You are only billed on those phone records appended
11. 38
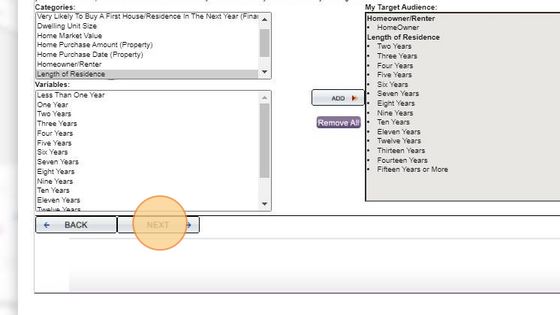
In this example we selected Homeowners only by selecting that Category (above) and then from the dropdown selected > Homeowners on the left and then used ADD> in the middle to include that filter in our list
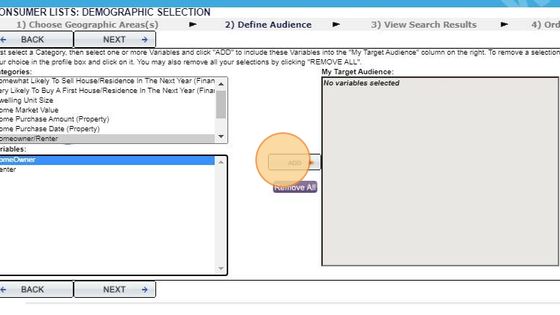
12. We also selected > Length of Residence in this example and chose those with two or more years owning this home. Simply click the first line, in our case “Two Years” line holding down the “ALT key” go down and click/add additional filters until you have the selection you would like. Then select > ADD in the Middle

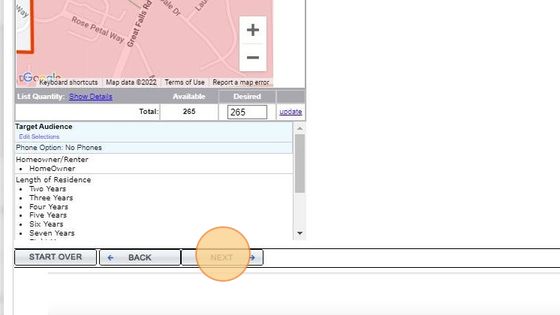
13. When all your data filters are completed the select > Next on the bottom (if you don’t see use your gray scroll bar on the right as in previous notes)
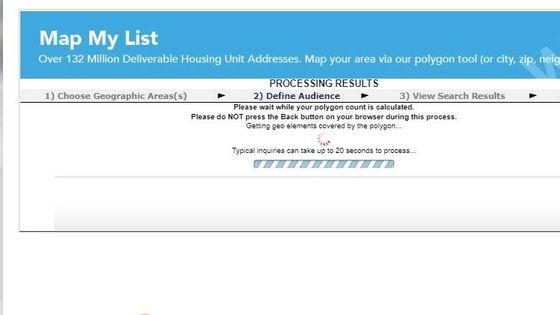
14. The system will pull those address that match all your Geo and data filters
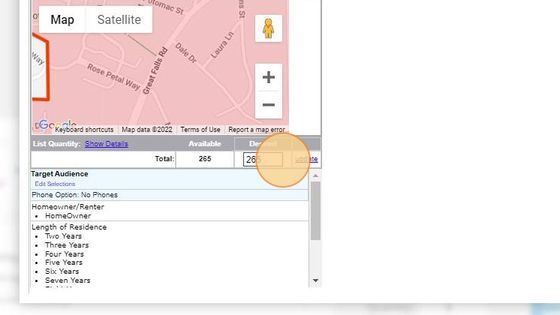
15. Once the count is ready it will be displayed. In our example 265 homes matched all our criteria.
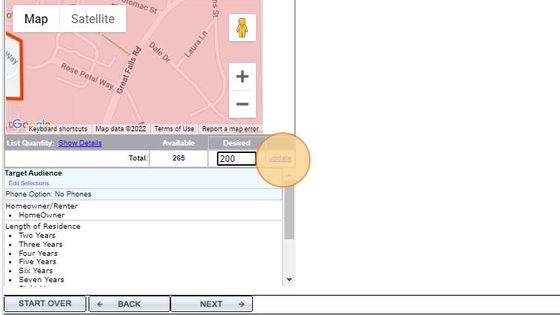
16. If you want to adjust your count less than what was pulled (changed to 200) you can type in a lessor quantity in the > “Desired” box than then > Update. Note 100 is the minimum for this database. if you want more you would have to go > BACK or and either change your data filters (i.e. add back in all years of ownership) or increase your polygon area or start over.
17. Once you accept your count (we kept all 265 in our example) then select >NEXT from the bottom menu, If you don’t see, you can you the larger scroll on the right as previously noted.
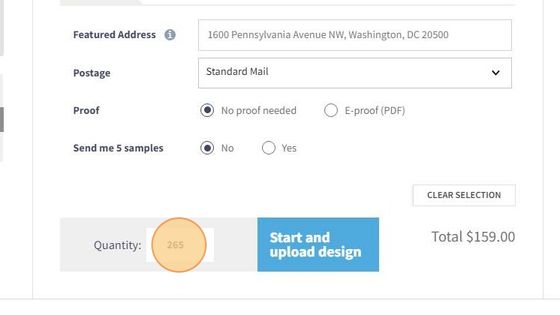
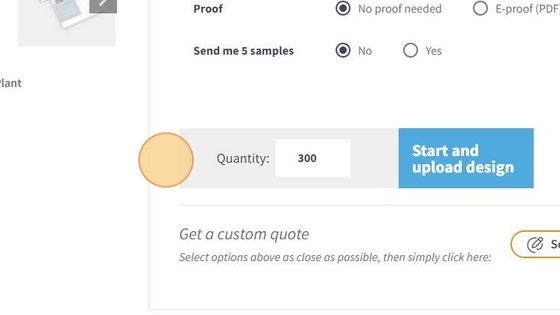
18. Within a few seconds you will back to your Configure menu, the total count will automatically populate your quantity for the order. Make your other product selections, size, paper etc. and you are all set. Click the blue Start and upload or design online button to upload your PDF art file or use one of our templates.
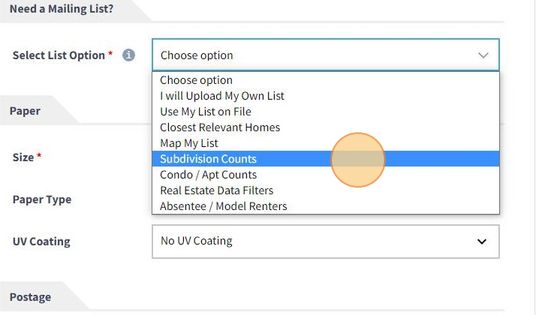
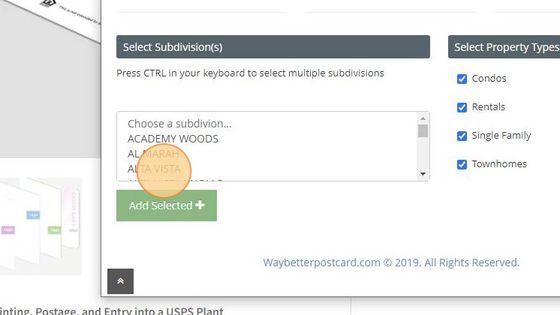
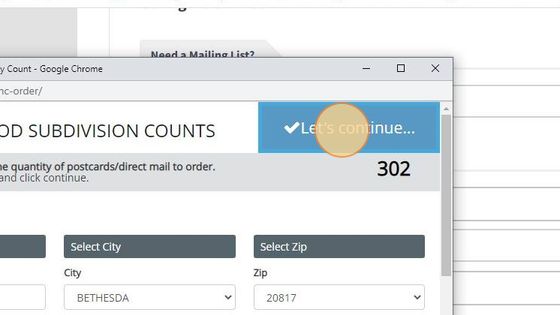
1. From – Select List Option > Subdivision
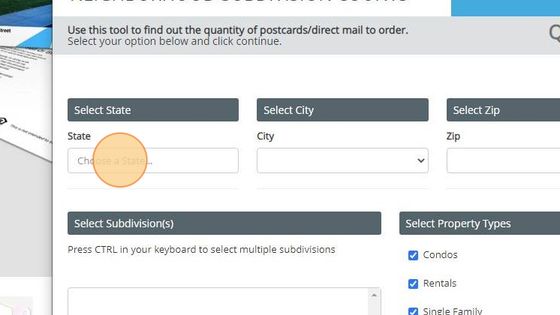
2. The Metro DC-MD-VA database selector will open. Start by selecting the “State” where the subdivision is located, then select the City and State
3. When your top Geo Selects are done, a drop down will appear with all the subdivisions and to the right you can select the types of properties you want as well
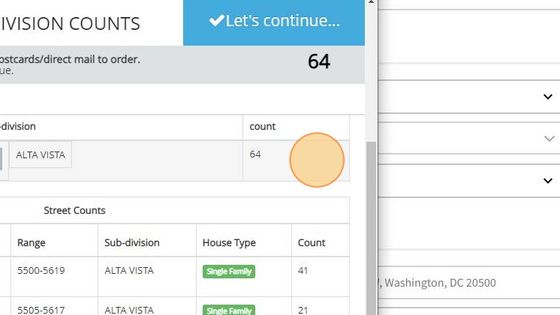
4. Three streets are in that subdivision and the block ranges will appears as well as the house type and the count for the Block/Street. The total was 64
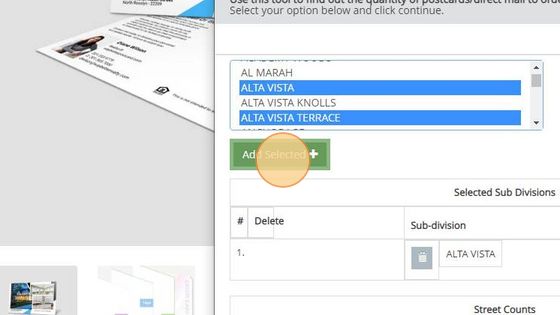
5. Also wanted was “ALTA VISTA TERRACE” for this mailing so after selecting Alta Vista (or if it was already selected) I held down the “ALT” key on keyboard and selected “ALTA VISTA TERRECE” Note a few subdivisions will span 2 different zip codes. If you want both zip codes, you would make your initial selections then go back up to and change State, City, Zip again and add to your current list.
6. Now below you will the original selection and then the add or addition subdvivon with its Block and Street details. My quantity has increased to “307” as well.
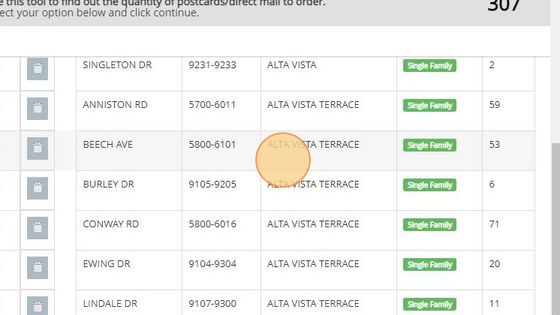
7. DELETE A BLOCK/STREET – To edit or delete a block and street on the left is a trashcan/delete button, once selected it will remove that from your count and list.

8. When finished select in the blue tab > Let’s Continue
The database will close, Your count total will populate the quantity for your order.
1. Select Condo / Apt Counts from dropdown

2. First select: Apartments (RENTALS) or Condos (Condos, Co-Ops other types of multi-dwellings) then make your Geo Selects: State, City and Zip of the buildings you want to target for your mailing

3. Once your Geo Selects are complete, a drop down will appear you can select from.
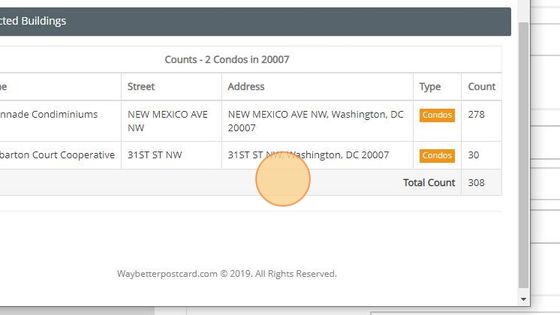
4. When you have competed your selection, Click “Let’s Continue”
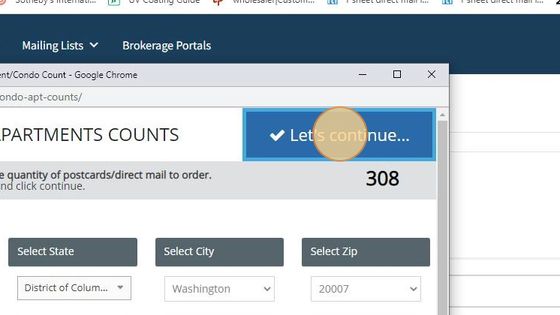
5. You will return to the Configure product area to finish your build/specs. Your order total has been updated.

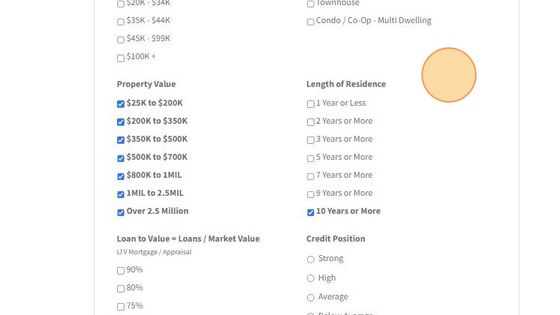
1. Select Real Estate Data Filters
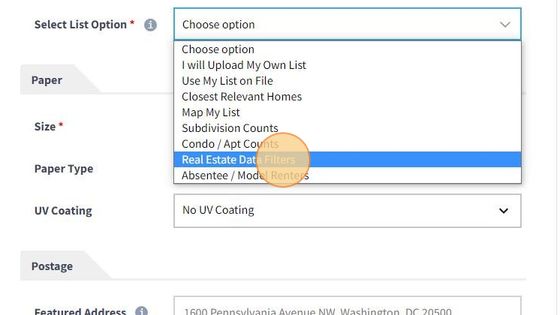
2. Two options appear – Use Geographic Area (most popular). Type in any description of the area you want to target for your mailing. Blocks-/Streets- Neighborhoods- Subs, Buildings, Zip Code etc.

3. Your first area will contain some predetermined database we have setup to compile or for Custom- Build My Own. These our ideal for agent marketing.
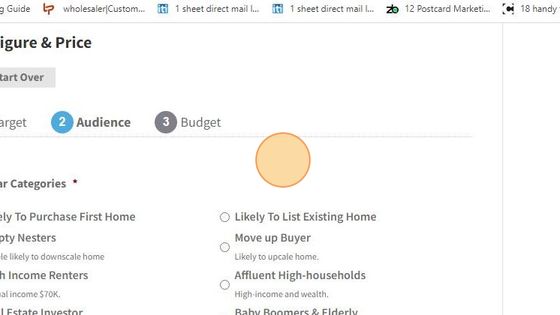
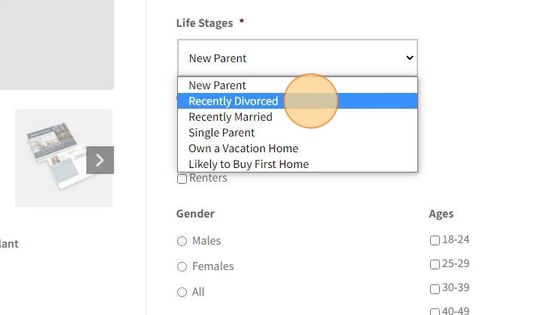
4. Life Stages – We can compile a list based on these popular stages in life.
5. Custom- Build My Own will provide you some real estate centric data
using both property and demographic filters
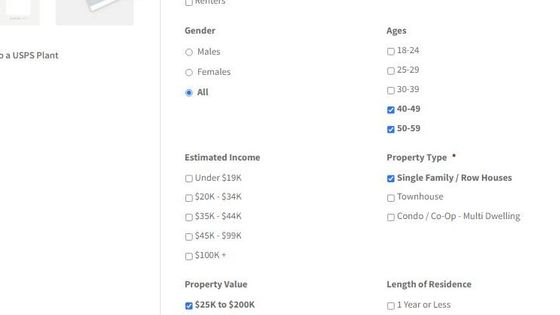
6. Additional Data Filers – Custom- Build My Own.
7. Your budget will determine the Quantity to be mailed. There are often more targets than budget dollars, this tool will allow you to easily determine you list total and then continue.

8. You’ll return to the “Configure Product” section to finish your product build The Quantity total at the the bottom, will be updated (you can adjust it here as well.

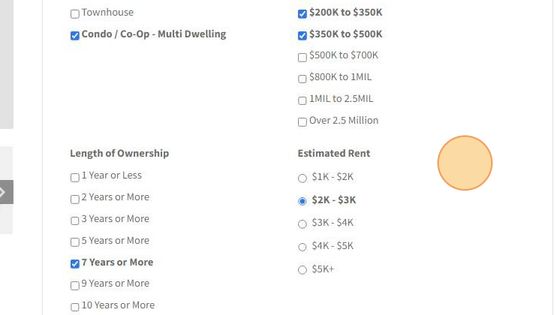
1. You can choose between Absentee (Non Owner Occupant / Investors) or Presumed renters of real property (not large commercial rentals)
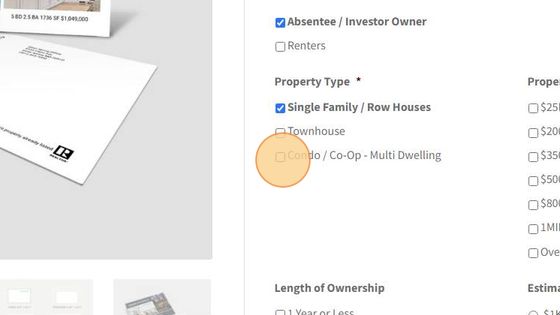
2. Make your property and demographic selections
Use one of your list or multiple lists we have on file for you in our list manager platform
– My Mailing List. We can build, manage, maintain, and update all your mailing lists – Geo Farms, SOI, Seller Direct/Golden Letters, Do Not Mail and more! Access this via your account page (Menu up top > “My Account”), then open > “My Mailing List” on the left. Here you can see the list name, number of addresses in that list and download that list. You can add or delete records, upload any updated list or even order a new list or request a count.
Choose the combination that best aligns with their marketing goals and budget.
Our comprehensive mailing list and data services offer a range of Audience Approach and Personalization options tailored to meet the diverse needs of real estate agents aiming to enhance their print and mail campaigns for lead generation.
In terms of Audience Approach, clients can choose to target all property owners, both occupied and non-occupied, within their specified geographic area for effective Geo Farming. Alternatively, they may opt for more specific targeting, focusing on occupied property owners, non-occupied property owners (such as absentee or investor owners), or a combination of both at site and tax invoice addresses. These choices come with varying price per piece considerations, providing flexibility to align with marketing strategies and budget constraints.
On the Personalization front, clients can select from default options like “Current Resident” or opt for increased personalization by including owner names or premium options, offering detailed variations in addressing recipients. This versatile array of options allows real estate professionals to tailor their mailing lists precisely to their target audience while accommodating different levels of personalization to maximize campaign impact.
Audience Approach:
All Property Owners (Occupied & Non-Occupied) at Site Address (Popular with Geo Farming)• Description: Target all property owners, whether they live on the property or not, within your specified geographic area.
• Pricing: No Pricing Impact Occupied Property Owners at Site Address (area with property values 5mil +)
• Description: Focus on property owners who live on the property within your target area.
• Pricing: May impact price per piece ($0.01 – $0.04) area and property values. Non-Occupied Property Owners (Absentee or Investor Owners) at Site Address
• Description: Target property owners who do not live on the property within your target area.
• Pricing: May impact price per piece ($0.08 – $0.11) due to the specific audience. All Property Owners (Occupied & Non-Occupied) at Tax Invoice Address (Data Farming)
• Description: Reach property owners at their tax invoice address, irrespective of their physical location.
• Pricing: May impact price per piece ($0.04 – $0.06). All Property Owners at Site Address & Tax Invoice Address & Including Presumed Renters
• Description: Target both occupied and non-occupied property owners at both their site and tax invoice addresses.
• Pricing: May impact price per piece ($0.04 – $0.06) and increase total quantity.
(Don’t miss anyone!)
Personalization Options:
Default No-Personalization (Current Resident or *Neighbor)• Description: Standard non-personalized mail with a generic recipient title.
• Pricing: No price per piece impact. Main Owner First & Last Name Personalization
• Description: Personalize the mail with the first and last name of the property owner.**
• Pricing: Estimated impact of $0.03 – $0.05 per piece. Premium Personalization
• Description: In-depth personalization** with multiple name options or trust details.
• Pricing: Estimated impact of $0.04 – $0.05 per piece. Popular for Data Farming.
First Name Owner 1 & First Name Owner 2 w/Identical Last Name
First Name Owner 1 & Last Name Owner 1
First Name Owner 2 & Last Name Owner 2
Trust = Smith Residence or Smith Family
Trust = Trustee Name if Verified
*In certain postal areas, “Neighbor” used as the addressee name is acceptable. Place an inquiry, and we will find out.
**Regardless of personalization selections, all lists will contain some Current Resident addressee names, as a verified name is not always possible.
Change of Address
If you are using personalization in your address records, it is important to keep in mind the actions or rules you want taken when a CHANGE OF ADDRESS is reported for that record (or any record on your list).
As your prospects or consumers move, many (76%) will fill out a change of address form online or at their local Post Office. As a result, USPS will apply that move, and mail will now be forwarded to their new address. We access this information online 24/7 from the USPS server via batch processing when we validate any mailing list.
We also utilize a private move compiler (5 data compilers, 3 of which are the largest credit information reporting firms) for those who do not fill out a USPS Change of Address Form.
If your mailing address is not personalized, this usually has little effect. However, if you are using personalization and your target has moved, the question now becomes: Do you want to follow that person and now mail to them at their new address? Often the answer will vary, and more specifically, in our world of lead generation for listings, it will vary between the types of lists you have.
For Geo-Farming (and some data farms), generally, your focus is on the property site. So when the owner moves, normally you do not want to follow them but remain marketing to the new owner. Thus, you can continue your hyper-local marketing efforts.
If the list is based on your client or sphere (SOI list), you might want to follow them. These might be relationships you want to maintain and thus remain in contact at touch points with these contacts regardless of where they moved to.
Keep this in mind and communicate to us how you want your data maintained.
How To Order Direct Mail Postcards – Video
This will open in a new tab/window. You can close after
viewing and continue with your order.
1. Closest Relevant Homes – Option 2 w/data filters
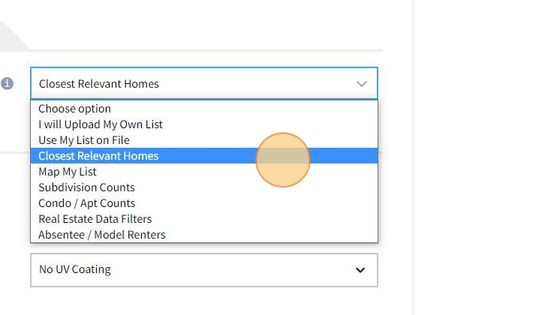
2. Select Option 2, if you want an alternative area to mail or if you want to add additional real estate centric data filers to your audience
3. Here you can 1) Change the area that you want to Mail 2) Use our custom compiler “Likely to List” or 3) Choose your own data filters
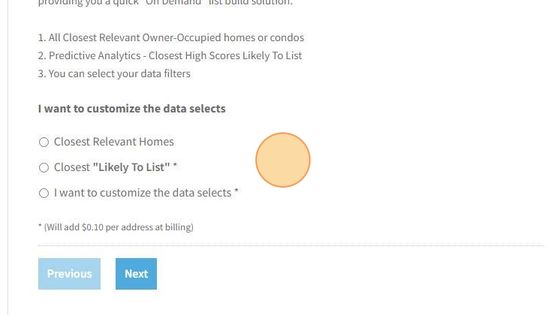
4. Make your selections here
5. Enter the quantity you want to mail for this campaign, and continue
6. Continue to Configure your card build. The quantity has been updated. You can change the quantity here aswell
Other
Payment is required for all orders and is accepted with any valid major credit card.
- Payment can me made by entering your Credit Card Info at Checkout or if you have a credit card saved in your online account it will appear as a selection. Credit card details – credit card type, credit card number, cardholder name, expiration date, and security code and billing address.
- If you have a billing account with our office you can select Billing/Invoice Account.
- BOTH – You may have have both of these payment options active. If you are placing orders via email, express products, your company’s marketing department or a third party of your choosing, that does not enter your credit card or use a saved card card at checkout, then you are required to have a billing account with our office. As of 1/1/24 no orders will advance without payment received or a valid Billing/Invoice Account.
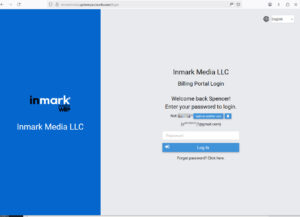
Online Account – Credit Card
Saving a Credit Card in your Online Account
From My Account section on the left navigate to > Addresses Confirm: Enter or Edit your billing address using the blue edit icon to the left, Next proceed to Payment Methods directly below: Follow the direction there to enter and save a credit card(s) for use at checkout. When you are in checkout and ready to make payment, that stored card{s} will appear.> Select it as a your method for this order and agree to terms and Checkout! (Note: you will also have an option there to use another card via entering if desired as well at this prompt)Update Your Stored/Save Card
From My Account section on the left navigate to > Payment Methods Follow the direction there to Update or Add New Credit card to your online accountEntering your Credit Card at checkout one time use
You dont have to store or save a credit card,. At checkout simply select credit card option (you will see credit card icons) you can enter your credit card information there for one time use.Billing/Invoice Account – Credit Card on File
If you have or would like to have our billing department process your payment instead of directly paying at checkout, you can use/create a Billing Account. Your order is processed an invoice is then generated. Once your order has left our facility (shipped, mailed etc. or if a deposit) then the invoice is processed for payment by our office with the valid credit card on file, you have authorized us to use. Credit card details required – credit card type, credit card number, cardholder name, expiration date, and security code.Why you would consider a Billing Account
If you use any third party company, team designer/admin, brokerage marketing associates/managers or an outside firm, having a billing account is recommended so those individuals can place orders on your behalf without having access to your credit card info. Otherwise, they will have to initiate payment at checkout in order for your your to advance and start processing.
Starting on On Jan 20, 2025, no orders will be processed that use payment form “Billing Account”, unless there is an existing billing account or a billing account form has been submitted.
Update or Open a Billing Account
To update – open or revise a billing account credit card on file with our office simply submit the web form in the link below.
Update My Billing/Invoice Account
Access Your Billing/Invoice Account Online
You can view your Billing/Invoice account in detail anytime by entering your login at https://inmarkmedia.gotomyaccounts.com/login
We process your credit card payments through one of two merchant service companies – Square and QuickBooks. They help us ensure the very best security and service at all times. We provide them access as well to any info related to the account if additional verification is needed. You might notice that in our checkout the time to process your payment is a bit long that others possibly, that is because we request three levels of verification to ensure the transaction is not fraudulent as well as obtaining an IP registration. Keep in mind that you must be in the Continental United States to process a payment as well. If you are traveling and in a “closer” foreign country, you might be able to process a transaction , however it will be based on your past history with your card issuer.
Waybetterpostcard.com (our website name/orl) may or may not appear, however our company name: Inmark Media, LLC will always appear with most credit card issuers. Usually the type of product/purchase will display as either Professional Services or Marketing Services. The line item on a statement often reads: SQUARE Professional Services SQ Inmark Media, LLC ……………….$34.33 QuickBooks qb Inmark Media, LLC. (Marketing Services and or product). ……………….$34.33 You can view your invoices from your online account. Invoices are different from orders. Often they will be the same total but details and specifications may vary.- Orders are the instrument used to initiate and process the product or service you selected.
- Invoices will reflect the final and actual cost associated with your orders and often include more detail as far as price per piece, description etc.
If you have any question or concerns related to a charge, please email or call us (301) 565-7000 or (301) 244-5383. We are available 24/7. During non traditional business hours we might not answer your call, however normally we will return your call within 10-15 minutes. You can also reach us via our CHAT located in the lower right corner. There you can request to speak to someone as well rather than answering questions or being directed to related issues.
We take payment processing very serious. And 49.1% of the website updates we preform in any given year are related to security. Our (2)) processing firms actually hold any credit cards you may have on file or enter for a transaction on their servers. This ensures the very best protection that can be offered.
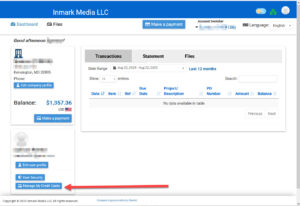
Note: If you maintain a billing account or you can also request access to our separate Billing Portal. Here you can find ALL

Access your Billing Account via The Billing Portal
- Update your payment method on file
- Access your all your account transactions
- Run filters to download all receipts for a given period to calculate expenses
Go To> https://inmarkmedia.gotomyaccounts.com/login
Enter you credentials
Manage Add Credit Card(s)
Saving a Credit Card in Account
From first screen after you log in on the bottom left select > Manage My Credit Cards )
Update Your Stored/Save Card

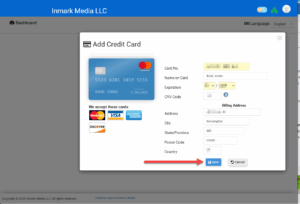
Enter the information as it appears on your card and or billing statement and then Select >Save
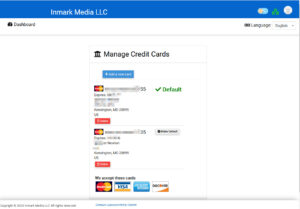
Updated Manage My Cards
Why you would consider a Billing Account
If you use any third party company, team designer/admin, brokerage marketing associates/managers or an outside firm, having a billing account is recommended so those individuals can place orders on your behalf without having access to your credit card info. Otherwise, they will have to initiate payment at checkout in order for your your to advance and start processing.
Starting on On Jan 20, 2025, no orders will be processed that use payment form “Billing Account”, unless there is an existing billing account, billing portal established or a billing account form has been submitted.
Update or Open a Billing Account
To update – open or revise a billing account credit card on file with our office simply submit the web form in the link below.
You access your account any time 24/7 by signing in at https://inmarkmedia.gotomyaccounts.com/login
Certain direct mail campaings may benefit from a process known a Density and Sequence Coding.
Density and Sequence Coding in Direct Mail: How It Works and Why It Matters
Certain direct mail campaigns can benefit significantly from a process known as Density and Sequence Coding.USPS Marketing Mail (formerly Standard Mail or “Bulk Mail”)
These terms all refer to essentially the same category of mail. When mailpieces are entered into the USPS system, they are organized and grouped by sequence and geography before reaching the local post office. This reduces the amount of sorting the USPS must perform. Following this same concept, all addresses are matched against the USPS database for validation and certification. However, there is far more data associated with an address than just street, city, state, and ZIP code. Some USPS-certified mailers can access this additional data, match it to your mailing list, and append key fields that further improve presorting and qualification for deeper postage discounts. In some cases, this can reclassify the mailing into lower-cost secondary rate categories. By appending data such as carrier route and walk sequence, mailings can qualify for better pricing on larger neighborhood-based lists. It can also allow a piece to mail as a flat rather than a letter, eliminating the need for folding or adding multiple tabs.Why Route and Sequence Data Matters
Appending carrier route and walk sequence data to a mailing list allows mailers to qualify for the deepest USPS Marketing Mail and Periodicals postage discounts-specifically High Density and Saturation rates. These rates are significantly lower than basic presorted or automation rates because the mail is already sorted in the exact order the carrier delivers it. This saves the USPS substantial processing time, and those savings are passed on to the mailer.How It Works
To perform density and sequence coding, several components are required:-
Access to the USPS database
The USPS address database is live and updates every 2-3 hours, 24/7. A secure connection is required. -
Certified address-matching software
Specialized software matches your mailing list to the official USPS database. -
Data analysis and appending
Once matched, additional USPS fields-such as carrier route, delivery point, and walk sequence-are appended to each record in your list.
Walk Sequence Data
The USPS provides data products such as the Delivery Sequence File (DSF2) to licensed partners and vendors. This data sorts addresses into the precise order a carrier walks their route and assigns a unique sequence number to each address.Preparation Requirements
- Mailers must use CASS-certified software to ensure address accuracy.
- Walk sequence data must be updated within 90 days of the mailing date.
- Mailpieces must be physically sorted into trays or bundles in walk-sequence order and properly labeled.
Eligibility and Requirements
To qualify for enhanced carrier route pricing, mailings must meet the following criteria:Volume
- Minimum of 200 pieces or 50 pounds per mailing.
Density
High Density- At least 125 pieces per carrier route, or
- One piece for every possible delivery if the route has fewer than 125 stops.
- At least 90% of active residential addresses, or
- 75% of total active possible delivery addresses on each carrier route.
Automation Compatibility
For letter-size mail at high-density or saturation rates:- Pieces must be automation-compatible and include a Delivery Point Barcode (DPBC).
- An exception applies to simplified-address mail using ECRWSS (Enhanced Carrier Route Walk Sequence Saturation), which does not require a DPBC.
Benefits
Meeting these requirements can result in substantial postage savings:- Up to $0.05 per letter
- Up to $0.15 per flat
- Realtors – GeoFarming
- Local businesses
- Real estate and retail advertisers with dense local coverage
- Newspapers
- Political campaigns
If you have a specific mailing list size or mailpiece type (letter or flat) in mind, we can estimate potential savings and determine whether this process is a good fit for your campaign. 📧 Contact us at hello@waybetterpostcard.com
Product Questions
Considerations for Choosing the Perfect Postcard Size
Cost-Effectiveness:If you can effectively get your message across to the recipient in a 4.25 x 5.5 postcard, and you are comfortable with the “impact” then choose this option, as it is the most cost-effective card to manufacture and mail. Space:
If your message is better served by using more space, then choose either the 9 x 6 or 11 “x 5.5” options. Keep in mind the cost to manufacture/produce the 8.5x 5.5. or 6 x 9 is less than the 6 x 11; however, the postage for both will be the same. Make an Impact:
If you really want your piece to stand out in the mailbox, and your budget allows, you may want to look at the 11 x 8.5 size. It is the most expensive to print and mail, but it will definitely stand out. When you invest in a large postcard, you’re making sure you introduce yourself boldly. Large mailings are great for special offers, the first mailing in a series of postcards and simply if you want to grab attention and stand out from your competitors.
Standard Sizes
Standard Postcard (4.25” x 5.5”):With the least amount of space for content, this postcard is compact and optimal for simple, straight-to-the-point designs. It qualifies for a true first-class postcard rate. Jumbo (8.5″ x 5.5″):
It is hard to match the versatility of a 5.5″ x 8.5″ Jumbo Real Estate Postcard. It allows ample space to display high-quality larger images featuring a listing/sale. Often in smaller images details can be lost. Super Jumbo “6”x 9″:
This size offers the most versatility often. Popular for just about any real estate agent postcard campaign it is appealing as it can allow for more creative options, just due to its size. Panoramic 11″x 5.5″:
Almost the largest on the market that still qualifies for USPS “Letter Rate” this has been our favorite for real estate postcards at least when used along with the Jumbo. Tall Panoramic 6” x 11”:
Generally the largest on the market that qualifies for Letter Rate by USPS, the Tall Panoramic is very similar to the above Panoramic. Offers even greater versatility with larger proportions. The Giant 11″ x 8.5:
Reach prospects or clients and make a huge impact! At 8.5″x11″ these postcards get you noticed, both in the mailbox and when shuffled and reviewed.
Custom Sizes/Options
If you don’t see the size you want:
- USE: NEXT SIZE UP & ORDER
- If you are Ready To Go and Have your Own Art File, place your order using the NEXT SIZE UP. For example, if you want a 5″x7″ postcard then select our 8.5″x5.5″ Jumbo. Make all your other selections, Enter your QUANTITY, and place your order. Unfortunately, most of the time, there is no cost saving we can extend as our sizes already take into account sheet size optimization and yield, but if we can we will; otherwise, this allows you to get mailing started! If there are any issues we will reach out, and if we cannot accommodate the order, we will refund your payments made, in full.
- USE: Get A Quote:
- If you would like a quote for a custom card and you don’t see a certain size, or finish, or paper, etc. – Select the closest size and then make the closest other selections you can including QUANTITY, so we know how many you need, and SELECT GET A QUOTE (rather than upload or design). A form will open – Confirm a few items in the Notes section place those requirements/needs you have for your cards, or any special need for this mailer. Send. We will get the info back to you usually within 1-2 hours.
About Us
WayBetterPostcard is uniquely positioned at the intersection of cutting-edge technology and industry expertise to help you exceed your marketing goals. Our full-service facility has all data, print, finishing and mailing equipment “Under One Roof”. Linking these various machines with a single level of software has provided customers with everything from data processing and fulfillment to personalized hi-touch luxury campaigns at incredible value.
Our industry-leading quality is aided by the newest graphic advancements, such as our integrated “On The Fly – Fiery software” – this offers some of the highest-caliber print quality across the broadest range of media for every job. We are a bonded List broker with relationships that span over 26 different compliers. To make a meaningful impression at the mailbox, leverage the unparalleled expertise and technology of WayBetterPostcard to create the perfect direct mail campaign.
“`What sizes are available?
Our custom printed door hangers are available in two sizes: 3-1/2″W x 8-1/2″H and 4”W x 11”H.
Are templates available for Door Hangers?
Yes, downloadable templates that include all of the proper margins, bleeds, and sidelines are available in the Design Guidelines Tab.
What paper stocks and weights are available?
We offer door hanger printing on two coated stocks and in a variety of point weights. When choosing a point weight, remember that the larger the number, the thicker the stock. Learn more: Small Format Paper Stocks, Coated Paper Stocks vs. Uncoated Paper Stocks, Text Weight vs. Cover Weight
What margins are required for Door Hangers?
We prefer a safe zone margin of 0.25″ an a minimum of .125” should be left from all edges.
HOLE AREA (Die Cut): While we dont recommend, content can be included in the top portion where the hole and slit will be, it should be limited to the top corners and not placed around where the hole will be.Due to the variable nature of the manufacturing process, we cannot guarantee that the hole will be in the same place every single time. Therefore, at least .25” or 1/4” of margin should be left around the hole
Can the position of the hole be moved?
No, not for this product, however use this product to configure and request a “custom quote” see tab at rught under configure and build w
Will the holes fit all doorknobs?
The size of the hole was determined to fit the most common doorknob stems. The slit allows the Door Hanger to be placed on various sizes of knobs, handles, and even latch-style doors.
Do you want crop marks included with the print PDF for Door Hangers?
No we would rather not have crop marks or color registration bars just the art file WITH THE BLEED
I’m looking to print door hangers for specific addresses, do you offer variable printing?
Yes, we do offer variable printing, but it requires a custom quote.
Can I add a coating or laminate to my door hangers?
You can finish and protect your door hangers with one of our UV coatings or laminates like gloss, matte and soft touch.
Booklets are a little more complex. Also, if you have artwork you created from another company, it might not meet all requirements. For best results have your designer or yourself, follow the guidelines below
Here are guidelines/rules to follow when creating your Booklets:• Page counts start on the cover as page 1, inside cover as page 2 and so on.
• Total bleed is 0.125″ and total Safety is 0.25″ for Saddle Stitched and Any Coil Bound
• Total bleed is 0.125″ and total Safety is 0.50″ for Perfect Bound
• Only single pages will be accepted. NO readers OR printers spreads please. This allows us to set up your crossovers properly. For example, a (12) page – 8.5×11 booklet with bleed
should be a single (multipage) PDF file with – (12) 8.75×11.25 pages total. The first page is the Front Cover and the last page is the Back Cover.

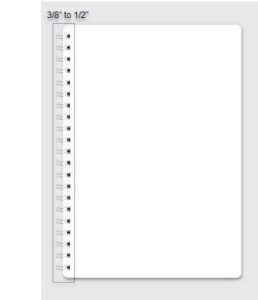
Keep in mind, the Wire Spiral Binding on the side will effect your page layout. Generally about 3/8″ to 1/2″ should be allocated for this on the covers and inside pages
(if you are submitting your own inside page deign rather then selecting – Blank- College Ruled or Dots) . For best results have your designer or yourself, follow the guidelines below and you are deigns template as a reference
Here are guidelines/rules to follow when creating your Booklets:
• Page counts start on the cover as page 1, inside cover as page 2 and so on.
• Total bleed is 0.125” and total Safety is 0.25” for Saddle Stitched and Any Coil Bound
• Spiral Coil will use 3/8″ to 1/2″ on the side for punch and bind.
• Only single pages will be accepted. NO readers OR printers spreads please. This allows us to set up your crossovers properly.
For example, a (12) page – 8.5×11 booklet with bleed
should be a single (multipage) PDF file with – (12) 8.75×11.25 pages total. The first page is the Front Cover and the last page is the Back Cover.
Text and images should be at least 0.25″ from the edge.
Full color backgrounds should be avoided.
Use a white backgrounds with low ink coverage (e.g. logo and text only).
Avoid or limit use of transparencies and gradients.
For window envelopes, the window area must be free of ink.
For Digital Envelopes:
4/0 = Full Color Front
4/4 = Full Color Front and Full Color on Back Flaps
0/4 = Full Color on Back flaps

For your Saddle Stitch Booklet, please provide a single pdf file that includes your cover and interior pages.
We request that the file be sent as single pages, in one multi-page PDF. Please include the pages in this order:
Outside front cover
Inside front cover
Page one
Page two
Page three
Page etc.
Inside back cover
Outside back cover
Thus, when the pages are printed and assembled they will appear as below:
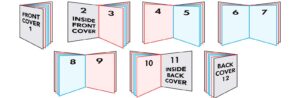
Please Note: Uploading a single-page PDF file does not mean uploading
one PDF for each page. It means all the pages in your PDF file should
be single pages not as spreads or facing pages.
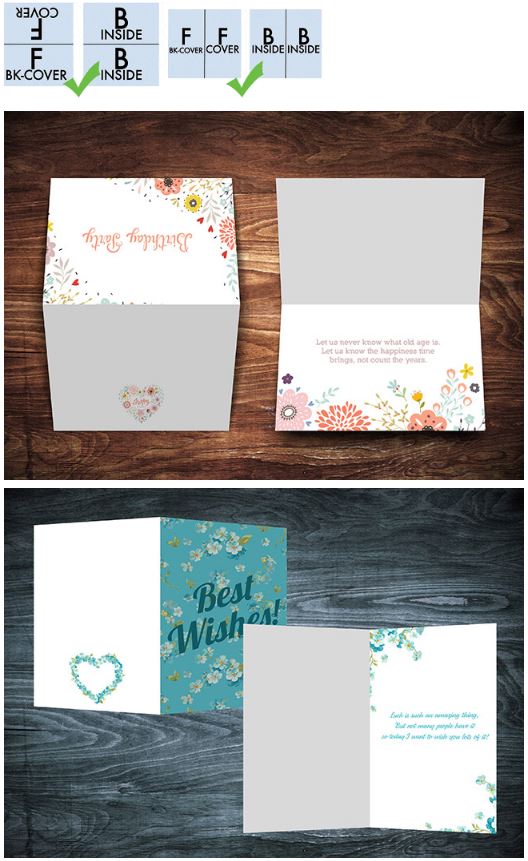
For a folded note cards card, please send your artwork as shown if possible.
Flyers
Booklets are a little more complex. Also, if you have artwork you created from another company, it might not meet all requirements. For best results have your designer or yourself, follow the guidelines below
Here are guidelines/rules to follow when creating your Booklets:• Page counts start on the cover as page 1, inside cover as page 2 and so on.
• Total bleed is 0.125″ and total Safety is 0.25″ for Saddle Stitched and Any Coil Bound
• Total bleed is 0.125″ and total Safety is 0.50″ for Perfect Bound
• Only single pages will be accepted. NO readers OR printers spreads please. This allows us to set up your crossovers properly. For example, a (12) page – 8.5×11 booklet with bleed
should be a single (multipage) PDF file with – (12) 8.75×11.25 pages total. The first page is the Front Cover and the last page is the Back Cover.
Signs Outdoor – Ridged Media Riders – Main Panels
Booklets are a little more complex. Also, if you have artwork you created from another company, it might not meet all requirements. For best results have your designer or yourself, follow the guidelines below
Here are guidelines/rules to follow when creating your Booklets:• Page counts start on the cover as page 1, inside cover as page 2 and so on.
• Total bleed is 0.125″ and total Safety is 0.25″ for Saddle Stitched and Any Coil Bound
• Total bleed is 0.125″ and total Safety is 0.50″ for Perfect Bound
• Only single pages will be accepted. NO readers OR printers spreads please. This allows us to set up your crossovers properly. For example, a (12) page – 8.5×11 booklet with bleed
should be a single (multipage) PDF file with – (12) 8.75×11.25 pages total. The first page is the Front Cover and the last page is the Back Cover.
This is the most frequent binding method we use at WayBetterPostcard. Saddle stitching is where printed sheets are folded in half and secured along the spine, usually with metal staples. This creates a single signature of pages that can have a thicker paper stock used for a self-cover, or go without. Saddle stitching is a very cost effective and quick way to bind pages together, making it a popular choice with our customers.
Important Details:
Min Page Count 8 Max 60-64 (depends on paper choices)*Total Page Count Must be divisible by 4
- Often we can add a blank inside and or outside cover to easily get you projects page count with this requirement at no charge
Agent Magazines
Property Booklet Brochure
Guidebook Sell guide and Buyer Guide
Listing Presentations
Luxury Listing Presentations
Brand Books
Brochures
Event Programs
Newsletters
Quarterly Market Reports Key Characteristics of Saddle Stitching
Very economical
Booklet opens flat
Can go up to 60-64 pages
Square spine available on 24 pages and up
Can have different covers or be self-covered
Can be used with short and long print runs
Fast production time
A bit less durable (especially with no cover) Direct Mail
Yes and most economical
Booklets like these can mail as is no envelope or carrier required in most cases
Can go up to 60-64
PERFECT BINDING
Our next most popular option for binding is perfect bound books (or soft cover books). Pages are cut to the same size and glued together along the spine. This is then all encapsulated by a cover, giving the finished booklet a very professional feel. Unlike saddle stitching, perfect binding allows for a printable spine which can display title and branding information. The main limitation to perfect binding is that there needs to be enough pages to make a 4mm spine, typically 28 pages or so. However see below if your book has less in page count we know have a product!
Min Page Count 26 Max 320 (depends on paper choices)Total Page Count Must be divisible by 2
Frequent uses for Perfect Binding
Agent MagazinesGuidebook Sell guide and Buyer Guide
Luxury Property Booklet Brochure
Luxury Listing Presentations
Brand Books
Key Characteristics for Perfect Binding
The best for Luxury property or listing collateral Due Perfect bound books do not lay flat when open due to the square spineFlat edge for spine allows room for printing on some books
More economical than case bound or hardcover books, but less durable
Neater/more refined appearance than saddle stitched or mechanically bound books
Easy to stack
Perfectly trimmed edges
Will damage over time if page count is high
Has a minimum spine width of 4mm Low Page Count Perfect binding
Our next most popular option for binding is perfect bound books (or soft cover books). Pages are cut to the same size and glued together along the spine. WIRE-O/SPIRAL BINDING
Wire binding
Wire-O and Spiral binding is great for fast production runs of booklets for generally a lower cost. This method is where holes a drilled or punched down one side of the pages and bound together with a wire through the holes or a spiral that is threaded through them. This binding method does not include a printed spine and usually has a cover added to the booklet to protect the pages. This ‘punch and bind’ method of booklet binding is fairly inexpensive and allows the booklet to open back on itself, making it ideal to write on without bending the spine.
Frequent uses for Wire-O/Spiral binding
PresentationsThesis
Reports
Manuals
Recipe books
Student exercise books
Diaries
Planners
Key Characteristics for Wire-O/Spiral Binding Books can be placed flat on surfaces
Spines are fairly durable and suitable for frequent use
Can work for most book sizes
Cheaper than other binding methods for short runs
Very practical
Able to update or remove sheets
Can open the book back on itself
Multiple cover options at all price points (eg, clear plastic, cardboard etc) CANADIAN BINDING
Canadian binding is a sub section of Wire-o/Spiral binding where a cover as added to wrap around the spine and the pages, giving the booklet a printable spine. This is popular for clients who want to keep the practicality and flexibility of wire-o/spiral bound books but also want to have a more professional appearance. GROMMET BINDING
Canadian binding is a sub section of Wire-o/Spiral binding where a cover as added to wrap around the spine and the pages, giving the booklet a printable spine. This is popular for clients who want to keep the practicality and flexibility of wire-o/spiral bound books but also want to have a more professional appearance. SCREW & POST (Chicago Screw)
Canadian binding is a sub section of Wire-o/Spiral binding where a cover as added to wrap around the spine and the pages, giving the booklet a printable spine. This is popular for clients who want to keep the practicality and flexibility of wire-o/spiral bound books but also want to have a more professional appearance.
HARDBACK BINDING
Hardcover binding
Hardcover binding is the most durable of the binding methods and also the most expensive. Due to its cost, most of the booklets that we print here at WayBetterPostcard tend to use one of the other binding methods. In saying that, most major high-end books will be hardcover books due to its long shelf life and professional/luxury finish. Hardcovers are typically a thick cardboard that is wrapped in a cloth, leather, vinyl, or durable paper stock and glued down with adhesive to form the cover. A number of signatures are then fastened together and glued to the spine.
Frequent uses for Hardcover Binding
NovelsPhotobooks
Encyclopedias
Special edition books
Any printed item that is geared towards a higher sale price
Key Characteristics for Hardcover Binding Generally, the most durable binding method
Expensive
Much longer production time than other binding methods
More finishing options for extra design features
HOW TO CHOOSE THE RIGHT BINDING METHOD
If you are still unsure of which binding method to use after reading the above, below are some simplified tables to help give you a quick idea which binding method will be more suitable.
(Please do note that sometimes there will be exceptions to these tables)
COST GUIDE(General, may differ slightly between short- and long-term runs) Method Cheap Mid-range Expensive
Saddle Stitch $
Perfect Binding $$
Wire-O/Spiral $
Canadian $$$$
Hard cover binding $$$$$ PAGE COUNT
Method Minimum Maximum
Saddle Stitch 8-128
Perfect Binding 28-320 Perfect Binding Thin 12-36
Wire-O/Spiral 4 300+**
Canadian 4 300+**
Comb binding 4 300+**
Hard cover binding 50 300+
*Larger page counts can wear the spine down/damage it faster over time
**Page maximum dependant on size of wiro/spiral/comb being used
PRODUCTIONMethod Short Run Long Run Turnaround Time
Saddle Stitch Y Y Fast
Perfect Binding Y Y Medium
Wire-O/Spiral Y Y Fast
Canadian Y Y Medium
Comb binding Y Y Fast
Hard cover binding Y Slow
USE
Method Short-term Long-term Heavy use (eg writing)
Saddle Stitch Y Y
Perfect Binding Y Y
Wire-O/Spiral Y Y Y
Canadian Y Y Y
Comb binding Y Y
Hard cover binding Y
If you have any further questions about which binding method is right for you, contact our friendly te
OPTIONS
Fold Out Pages (Great for floor plans or panoramic images)
Business Card Slits
Wire-O/Spiral Y Y Fast
Canadian Y Y Medium
Comb binding Y Y Fast
Hard cover binding Y Slow
USE
List/Data Type
We prefer lists to be uploaded/submitted in one of the following common formats: .CSV | .TXT | .XLS or .XLSX | .DBF ** Please do not submit any Apple number files if possible. Instead export as CSV from your Mac/Apple device. We do accept formats other than those listed above, however, additional time and fees may apply if it’s necessary to adjust or manipulate your data. If you’re unsure about your mailing list or have questions on exporting from your CRM, feel free to contact us.
Your File Names
File names should not have any of the following:
• Spaces (use ” _” rather than space if possible)
• Special Characters (!,@,#,$,% etc)
• Only 1 period(.)* that will be before the file extension name (see below)
• Other Punctuation or Hyphens
* Your computer will automatically attach a .xxx (i.e. .txt, .csv, .dbf, etc.) to the file name. This is called the file’s extension and is required. Please don’t remove or change this part of the file name
Format
You can download a sample file in this tab on the right. This format is built around an typical SOI based list. You can also use a simple format as well, see in the image below – First Name, Last Name, Address, City, State, Zip. Each address should be on a single row, with each element of the address in a separate column. If you have a secondary address – Apt/Condo/Unit # a column for that is fine if it is not already in the main address field.
Note: If your file has more columns don’t worry as long as you have the basics you are all set!
Save/ADD List(s) to Account
If you want to save that list you are uploading, for an order you can select > Yes. We will then add it to your My Mailing List so that it will be available next time in the “use My List on File” option
Note: You can also add mailing list(s) from the Top Menu > My Account
My Name Field
We do ask you to review the data in your name field as often we see data from various MLS services with a popular field know as “Owner Label” or “Mailing Label”. Often if you look closely at those names in that field, you’ll see about 20-40% of them are not formatted correctly or contain descriptions related to Trust or Multiple owners. We think using names is great! How using the wrong name or a poorly formatted name might not be the best impression to make. We provide you a few options.
Moved or Change of Address Records
We will process your list for the best possible delivery! A component in that process is matching your records/list with those that file filed a Change of Address Request with USPS as well as with a private database (Three major credit Bureaus). Then depending on your input we can Follow them to their new address or Replace with “Neighbor” or “Current Resident”. Or we can Remove them
Example
You have a SOI/Client List, and you sold a home to Bob & Wendy Smith. Their mail now goes to their new home so we would recommend you follow them and mail to their new address we obtained.
Your list is a Geo Farm or Neighborhood/Subdivision List, and an owner has moved. We would recommend that you don’t follow and instead leave the mail addressed to the address within your farm.
Duplicates
We can review your file for duplicate names. A common approach is when the name and the address are a match – Remove the duplicate(s). If there are two different names going to one similar address Bob Smith – Wendy Smith, we can Remove one of them or we can Merge the two names to a single record Bob & Wendy Smith. If there are multiple different names Bob Smith and Wendy Jones going to the same address we can merge as well keeping the 2 names but Merging into one record.
Friends and Family Script– We use a great many “data scripts” as we see various types of name and address configurations. This is a very advance method of not just removing duplicates, however analyzing multiple records with certain similar characteristics – then merging and identifying those that match..
Multiple List Upload
You can upload up to 4 lists for any single mailing. We will combine your lists and remove duplicates in the same manner as you selected above. If one of your lists is name with or similar to and SOI or Client List, those are what we refer to as the “Surviving Record”. Thus if that record or address is on a another list in your upload, then the SOI/Client List info for that record, is the one we will maintain.
Why Do Some of My Mailed Postcards Have Smudges or Scuff Marks?
Your cards are printed correctly and all ink is dry however, USPS sorting machines may not be calibrated correctly or are set to handle a wide variety of mail thickness due to deadlines and/or maintenance. they can penetrate the postcard’s paper, ink and color toner leaving black smudges, burn marks, scratches, scuffing, rub marks, tears, and/or even rips.
These smudges and rub or scuff marks have been referred to as “postcard (or mail) survivability.” Meaning, how well does the postcard survive while traveling through the high-speed rollers and sorting systems of the United States Postal Service (USPS)?
If you receive or are informed that your card was “SMUDGED” it does not mean all the card you mailed were! In fact at times when you are added to a list (SEED CARD) and your address is outside of the targeted area or is in a less saturated geo area, the chances of smudging increase, however, most of the time the main targeted prospects cards – are not! This is due to more In-depth presorting at our plant and less need for USPS machines
DETAILS
Every day, the United States Postal Service delivers nearly half a billion pieces of mail. In order to do that, USPS processes 20.2 million pieces of mail every hour. To accomplish this mammoth task, the postal service relies on heavy-duty sorting machines, which grip and roll mail as they sort it into the correct zip code bins. Your direct mail may go through several of these machines on the way to its final destination. This equipment can sometimes leave scuff marks or toner behind. In more unusual cases, they may even crumple or tear mail.
Rubbing/Scuffing Contact Marks
When the postcards hit the USPS mail system, a machine orients the postcard (or other piece of mail) and cancels the stamp or postage indicia. At the same time, a digital camera captures the address and ZIP code from the postcard and assigns a fluorescent inkjet barcode and identification number.
Next, the postcard is passed through a Delivery Bar Code Sorter (DBCS) system. Depending on how far the mail piece has to travel, it may be processed by four to six different DBCS machines along the way to its final destination (local post office). These sorting machines are made up of a series of belts and rollers that sort the mail based on outgoing ZIP codes. The black rubber belts and rollers are typically the culprits and are usually the reason why you might see color smudges or scuffing on your postcards. The rollers physically grip and contact the postcard as it pushes it through to the correct ZIP code bin. If the roller applies too much pressure as it grips the mail, it may penetrate the color toner on the surface of the postcard, leaving scuff marks. Occasionally, the equipment may even rip the cards. Usually these marks occur about halfway to three-quarters of the way down on either side of the card where the high-speed belts make contact.
Postcards sent via first class that are deemed as undeliverable by the USPS (meaning that they cannot be delivered to the addressee) are especially vulnerable to scuffing and marking. The USPS takes extra steps to attempt to deliver this class of mail. These postcards are intentionally sent through the DBCS sorters several additional times to ensure that they are in fact “undeliverable” before they are deemed to be dead. Next time you get your first class undeliverable postcards returned to you- take note as to how scuffed they look. We actually add Coating on Fist Class cards mailed to smaller list – no charge. As these very often can experience these marks. We actually add UV Coating on Fist Class cards mailed to smaller list – no charge. As these very often can experience these marks.
Heavy Solid Colors
Avoid solid black backgrounds. We’ve found that solid black backgrounds show postcard damage more so than white or color ink backgrounds. We advise against solid black backgrounds if you are concerned by postcard damage
Protective Coatings Can Help
Using a high-quality coated paper cover stock (versus uncoated stock) and applying a protective UV coating to both the front and back of your postcards are two good options to help reduce the occurrence of these scuff marks HOWEVER ARE NO GUARANTEE against scuffing. Thicker coated paper adds paper integrity and a UV coating adds a slick, protective layer that helps glide the postcard through the sorting process a bit easier. At times however, thinner paper stock travels better through the process. To help facilitate clean, smudge-free mail pieces, WayBetterPostcard.com/Inmark Media. LLC offers a “UV Coating” option and only the GLOSS option will add any protective finish.
For a couple of extra pennies per card, these options may be worth adding. They may not totally eliminate marks made by the machines, but they can provide better quality, more consistent-looking delivered postcards. We actually add Coating on Fist Class cards mailed to smaller list – no charge. As these very often can experience these marks.
Lastly, Don’t Sweat Direct Mail Damage
If you receive or are informed that your card was “SMUDGED” it does not mean all the card you mailed were! In fact at times when you are added to a list (SEED CARD) and your address is outside of the targeted area or is in a less saturated geo area, the chances of smudging increase, however, most of the time the main targeted prospects cards – are not! This is due to more In-depth presorting at our plant and less need for USPS machines. Many of the newer postal processing machines have an auto fit so after 1 or two cards the adjust the grippers.
Direct mail damage can be difficult to accept, particularly for marketers who are more used to digital channels. When you’re working in email, any imperfections in a message can be diagnosed and corrected before the next mailing—if not sooner. In social, you can preview your ads, seeing exactly what your customers will see, before they go live. This just isn’t the case with direct mail.
The postal service faces a gargantuan task each day to sort and deliver our mail, and while this massive operation is very impressive it is also imperfect. Addressed mail with an Intelligent Barcode is typically machine-sorted three to eight times before delivery. When mail is identified as undeliverable, it can be machine-sorted up to an additional eight times before being returned to sender. That leaves many opportunities for the machines to leave grime behind on your postcards.
The good news is, consumers are very used to receiving mail with scuffs and smudges. They are most likely to simply tune out such noise and focus on your marketing message the same as if the postcard wasn’t damaged.
So, don’t become too worried if you’ve noticed small amounts of direct mail damage. However, if you are an WayBetterPostcard.com/Inmark Media. LLC customer and you are noticing excessive postcard damage, please let us know so that we can contact the Postmaster. Sometimes, USPS needs to better clean and calibrate sorting machines so that excessive grime on the rollers doesn’t cause direct mail damage.
How To Order Direct Mail Postcards – Video
This will open in a new tab/window. You can close after
viewing and continue with your order.
Designer & Templates
Templates
Help Videos:
